
A frontal wig is often the secret behind why people appear to have such smooth and perfectly styled hair online. It's normal to not be sure about gluing it at first. No need to worry; you can absolutely look put-together at home, provided you have the right tools and a little time to spare.
This guide shows you how to put on a frontal wig step by step, so even if you're new to it, you can feel confident, comfortable, and get a natural-looking finish without feeling overwhelmed or confused.
What is a Frontal Wig?
A frontal wig is a kind of wig that has hair strands hand-tied into a thin, breathable lace material that goes from ear to ear across your hairline. This design looks like a real scalp. You can part your hair anywhere along the lace-covered front hairline, which gives you a lot of styling options, like high ponytails or deep side parts.
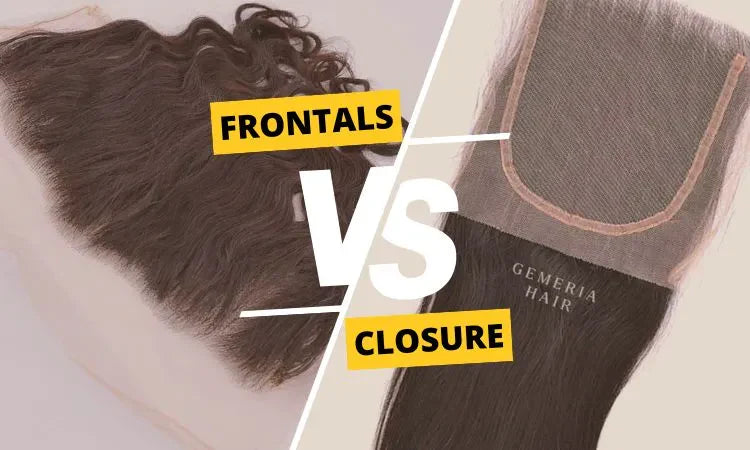
Frontal Wig vs Closure Wig
They are different because one has bigger lace. A closure wig usually has a smaller piece of lace, typically 4x4 or 5x5 inches, sitting right in the middle of the head. It is easy for beginners because it needs less glue, but you can style the parting in fewer ways. A frontal wig covers the entire perimeter of your forehead. While it requires more work to install, it offers the most adaptable and realistic appearance.
Essential Tools and Products You Need Before Wearing a Frontal Wig
Before you start your DIY frontal wig installation, gather these items:
-
A high-quality frontal wig (Gemeria Hair offers great options).
-
Wig cap (usually in a nude or tan shade).
-
Rubbing alcohol or a skin cleanser.
-
Lace adhesive or a strong-hold styling gel.
-
Sharp scissors or a small eyebrow razor.
-
A rattail comb.
Step-by-Step Frontal Wig Installation Process
Step 1: Prepare Your Natural Hair
The goal is to get your natural hair as flat as possible. You can do this by braiding your hair into small cornrows or pinning it back tightly. A wig can look quite large if your natural hair isn't well-groomed. Once your hair is flat, put on a wig cap. Pull the cap slightly past your hairline to protect your edges.
Step 2: Prep and Position the Wig
Clean your forehead so it is not oily. This helps the glue stick. Then put the wig on your head, keep it in the middle, and make sure it feels nice above your ears.
Step 3: Measure and Cut the Lace
The majority of brand-new wigs have extra lace that hangs off the front. Cut the lace with your scissors or an eyebrow razor. A jagged edge blends in better with the skin, so cutting in a zigzag pattern is preferable to cutting in a straight line. Be careful not to cut too close to the hair strands, as such actions can damage the wig and affect its natural look.
Step 4: Apply Adhesive
Apply a thin layer of holding gel or lace glue along your hairline after lifting the wig's front edge. Don't put glue in your hair. Use the comb's back to distribute the adhesive evenly. Let it sit until it's either dry to the touch or feels slightly tacky. If you're in a hurry, a blow dryer set to a cool temperature can speed things up.
Step 5: Secure and Press the Lace
Carefully pull the lace forward and press it into the glue. Use the fine-tooth side of a rattail comb to press the lace down firmly. Once it is in place, tie an elastic band or a silk scarf around your hairline for 10 to 15 minutes. This process, called melting, helps the lace disappear into your skin.
Step 6: Style Your Wig
Now comes the fun part. You can use a flat iron or curling wand to style your human hair extensions. If you have a curly wig, use a mix of water and leave-in conditioner to style a curly wig naturally. Use a hot comb to flatten the top of the wig for a sleek finish.
How to Make Your Frontal Wig Look Natural (Beginner Tips)
To make your frontal wig look natural, follow these frontal wig tips for beginners:
- Bleach the Knots: If the tiny black dots on the lace are visible, bleaching them makes them look like skin.
- Pluck the Hairline: Most wigs come too thick at the front. Employ tweezers to pluck a handful of hairs, crafting a more natural, graduated appearance.
- Tint the Lace: Use a bit of powder foundation or a lace tint spray on the underside of the lace to match your exact skin shade.
Common Frontal Wig Installation Mistakes Beginners Should Avoid
- Using too much glue: A thick layer of glue takes too long to dry and can become messy.
- Cutting too much lace: Always cut less than you think you need. You can always pare it down later.
- Ignoring skin prep: If you don't clean your skin with alcohol, the wig might slide off within hours.
- Putting glue on natural hair: This can cause breakage and hair loss when you try to remove the wig.
Why Choose Gemeria Hair Frontal Wigs?
When it comes to human hair extensions and lace frontals, quality is paramount.
Gemeria Hair provides top-tier, 100% human hair, guaranteeing a look and texture that feels completely authentic. The lace, delicate but resilient, makes it easier for beginners to achieve a seamless melt, without a lot of effort. Opting for a well-made wig is the key to maintaining soft, tangle-free hair that stands the test of time.
Conclusion
Installing a frontal wig may take some practice, but it helps you save time and money. It also makes you feel more confident styling your hair at home. By following this beginner guide, you can change your style while protecting your natural hair. Patience is key, and having the right tools at your disposal is essential.